Documentation sections
Traffic
Connecting via Cloudflare
If your site already sits behind Cloudflare, Cloudflare itself can insert our tag: a worker (a small program in your Cloudflare account) adds it to the <head> of your pages. You don't need server access, template edits or new DNS records.
On this page
Available from the Professional plan and on the trial.
What you need first
- A Cloudflare account that already has the landing's domain (zone).
- The code to paste and the worker code from the dashboard: Flows → ⋯ in the flow row → Connect → the Cloudflare block.
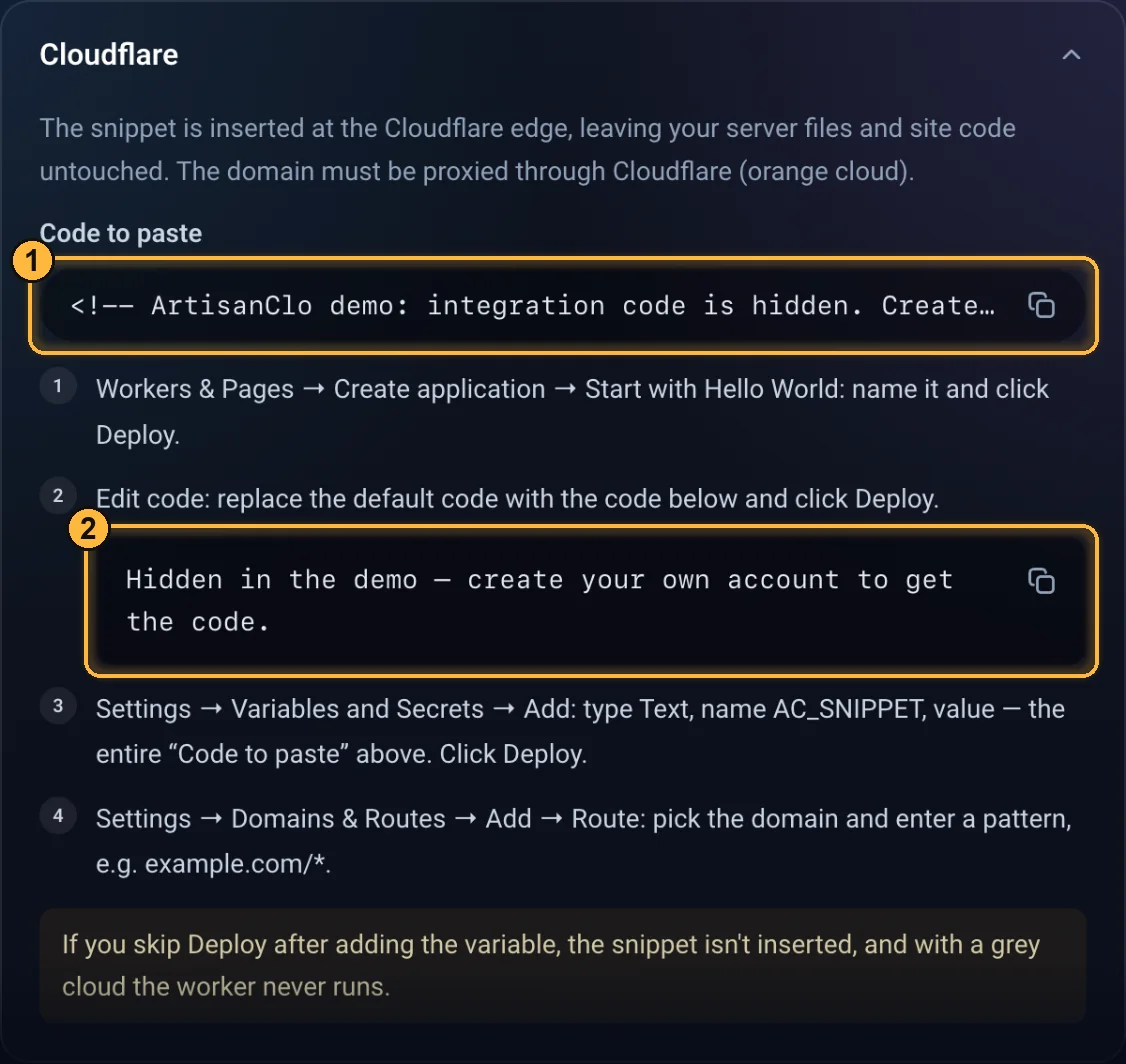
The Cloudflare block in the dashboard: 1 the code to paste, which goes into the AC_SNIPPET variable, 2 the worker code. Both are hidden in the demo account.
Step 0. Check for the orange cloud
The worker only runs for records that Cloudflare proxies. Check this up front: it's the most common reason “nothing works”.
Open the domain's DNS records
In the Cloudflare dashboard, pick the landing's domain, then in the left menu DNS → Records 1.
Look at the Proxy status column
The landing domain's record (usually an
AorCNAMEwith the domain or subdomain name) must have an orange cloud and “Proxied” 2. A gray cloud and “DNS only” means the request bypasses Cloudflare, and the worker won't run.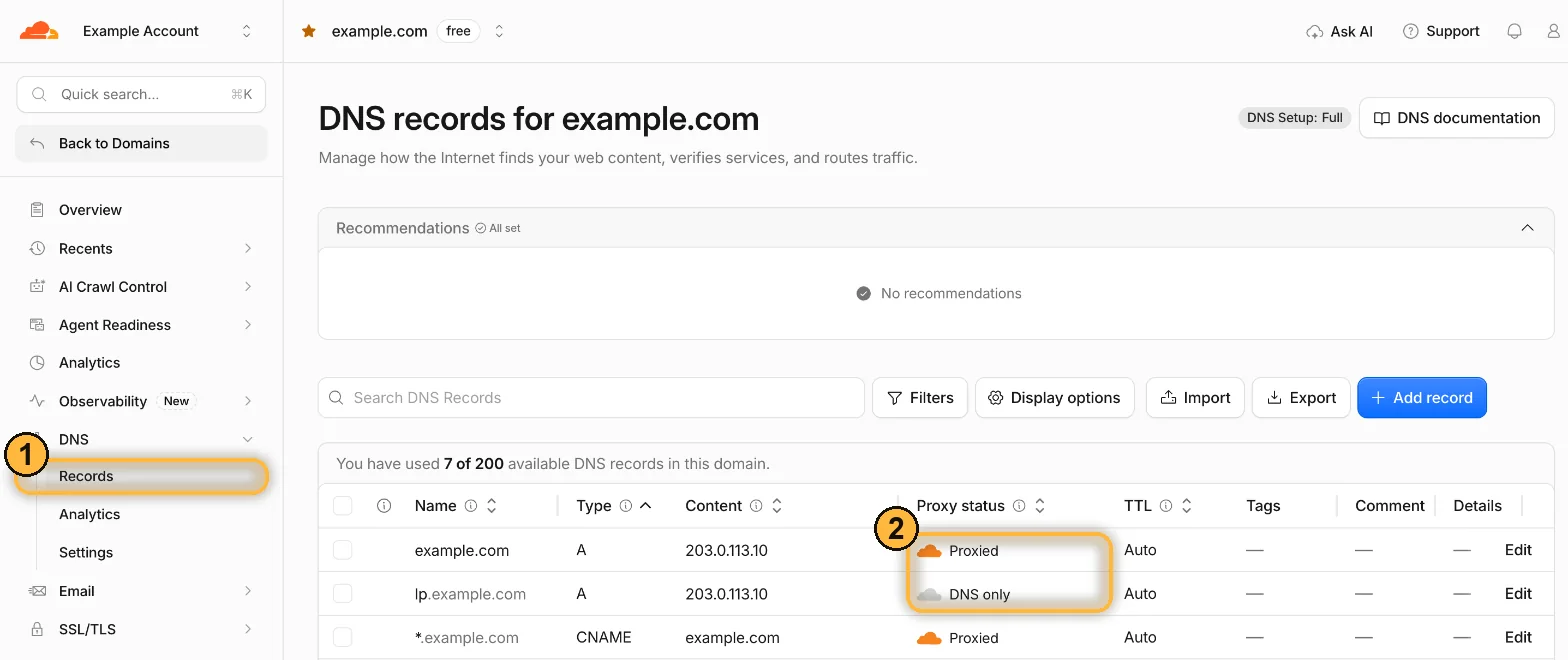
1 DNS → Records, 2 Proxied works, DNS only doesn't. Domains and addresses in the screenshot are replaced with examples. If the cloud is gray, click Edit on the record and turn on Proxy status. Keep the consequences in mind: with the orange cloud, the outside world sees Cloudflare's address instead of your server's, and the HTTPS certificate is issued by Cloudflare too.
Step 1. Create a worker
Sign in to the Cloudflare dashboard
Open
dash.cloudflare.comand sign in. The account home page opens with the menu on the left. In the Build group, click Compute 1.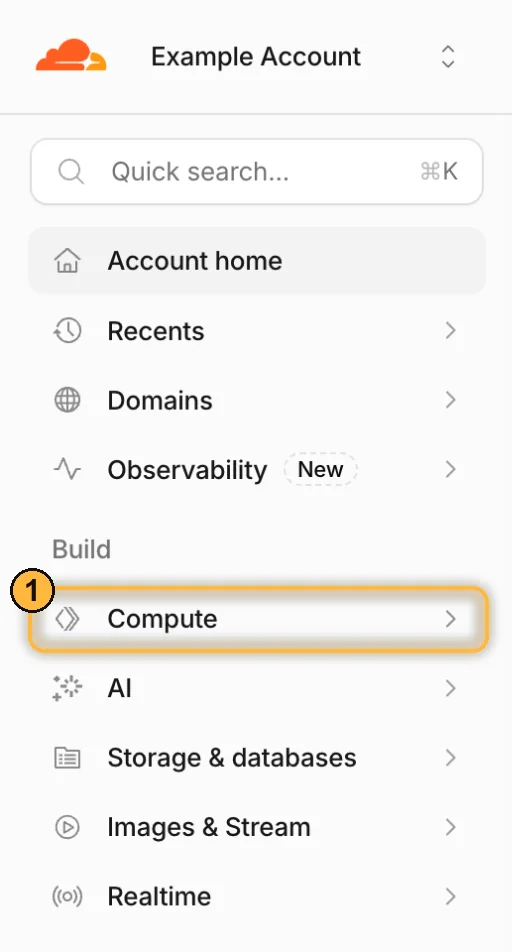
1 Compute expands the list of services. The account name and domains in the screenshot are hidden. Open Workers & Pages
A list expands under Compute. The first item is Workers & Pages 2.
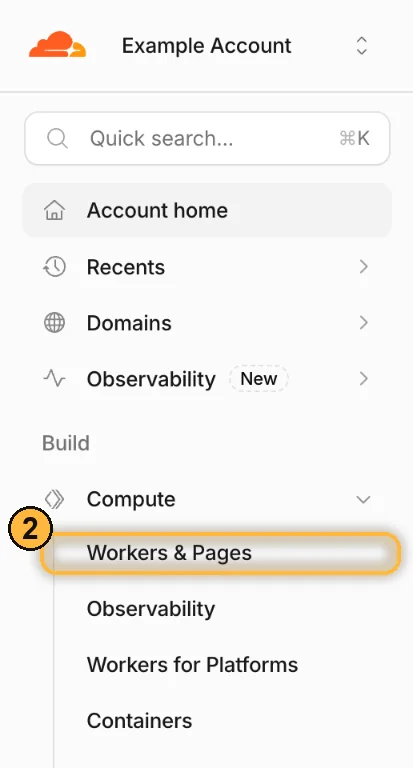
2 Workers & Pages. Click Create application
The account's application list opens (a new account shows “No projects found”). In the top right, click Create application 3.
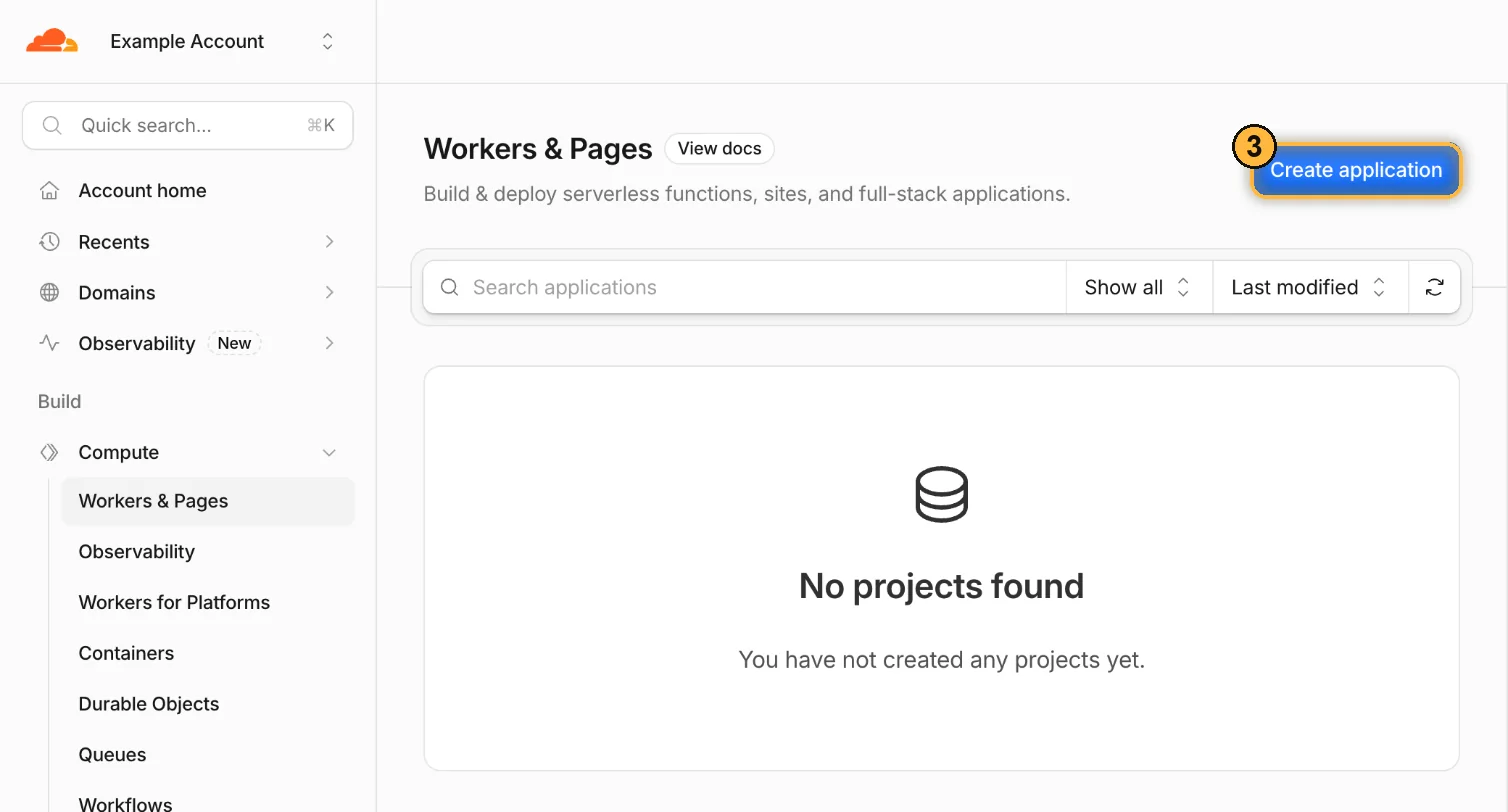
3 Create application. Choose “Start with Hello World!”
On the “Make something new” screen, click Start with Hello World! 4. You don't need GitHub, GitLab or templates.
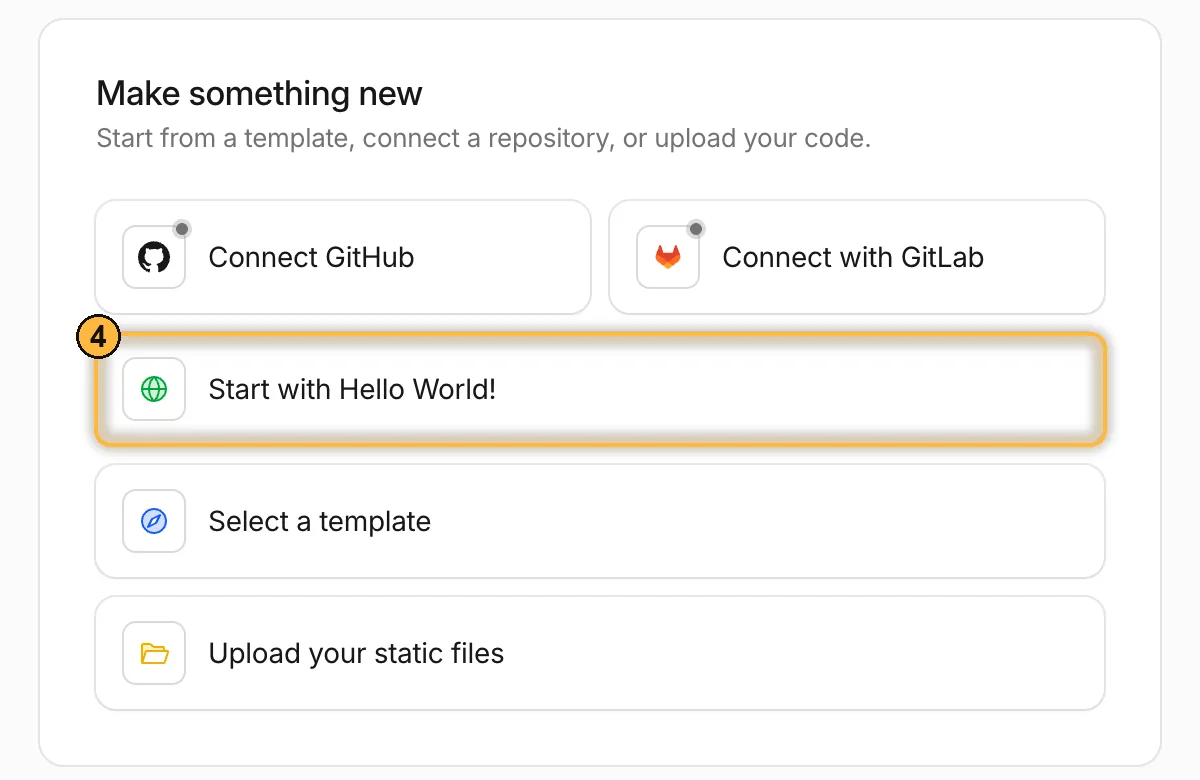
4 Start with Hello World! Set a name and click Deploy
In the Worker name field 5, Cloudflare suggests a random name: replace it with a neutral one in Latin letters, for example
my-landing-tag. The name shows in the*.workers.devaddress, so avoid words like “cloak”, “filter” and the offer's name. Don't touch the code in the preview, and click Deploy 6.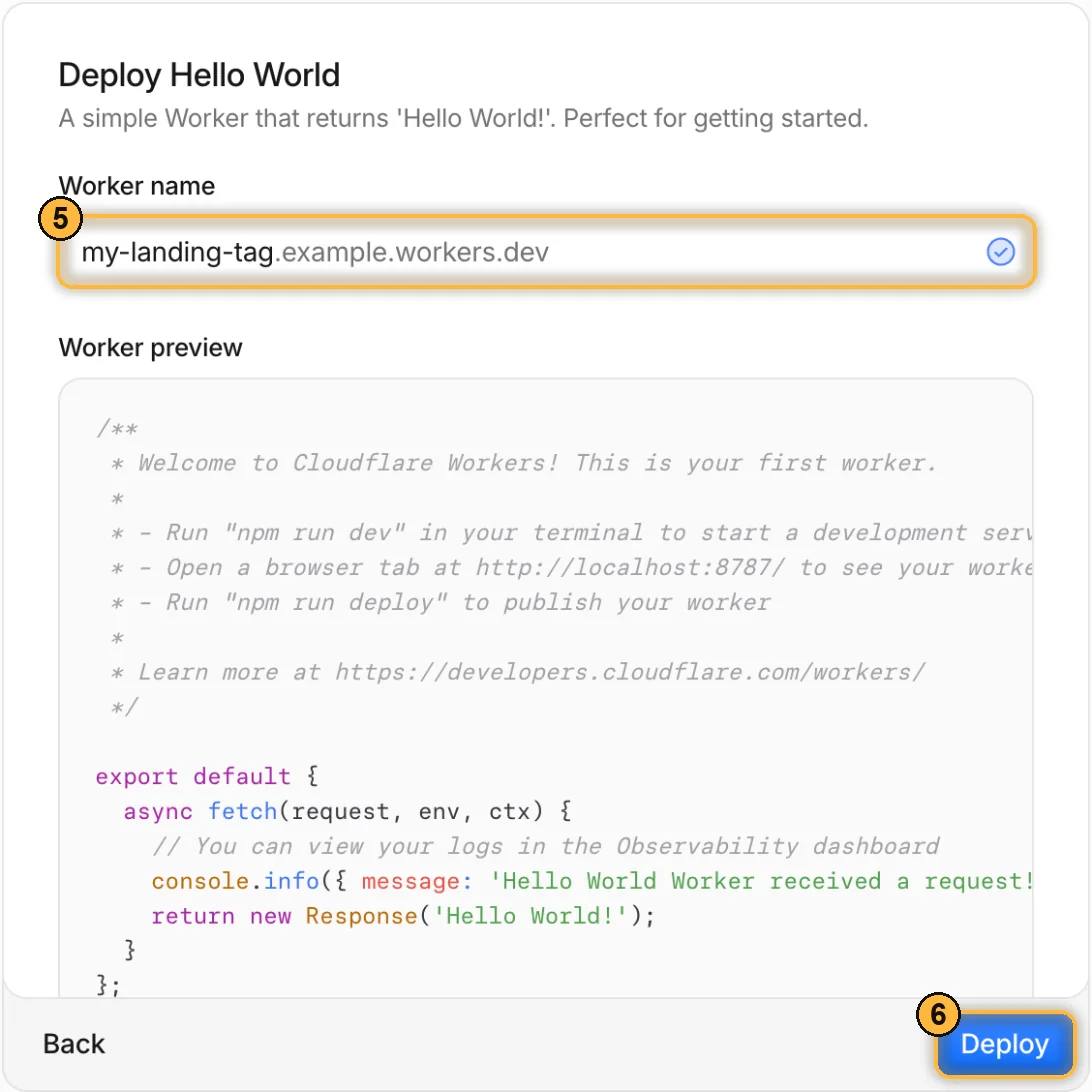
5 worker name, 6 Deploy. A few seconds later the worker page opens with an Edit code button and tabs, including Settings. If a different page opens, go back to Workers & Pages and click the worker's name in the list.
If Deploy won't click, the name is already taken or contains invalid characters: use only Latin letters, digits and hyphens.
Step 2. Paste the worker code
Open the editor
On the worker page, click Edit code. The editor opens with a
worker.js(orindex.js) file containing the “Hello World” code.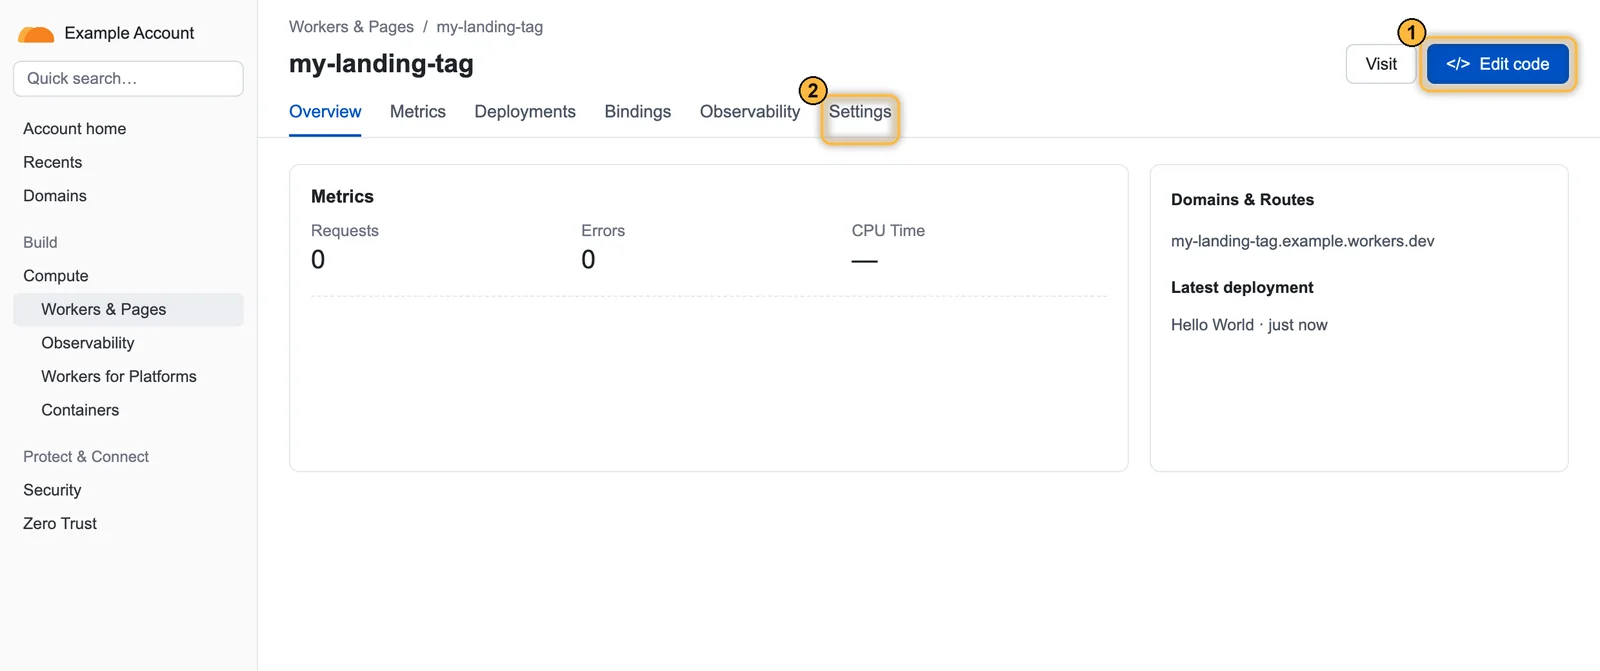
1 Edit code, 2 Settings. Mock-up of the Cloudflare screen with made-up data. Replace the code entirely
Select all the code in the editor (Cmd/Ctrl + A), delete it and paste the worker code from the dashboard: field 2 in the Cloudflare block. The first line of the pasted code is
const DEFAULT_SKIP_PATHS = [.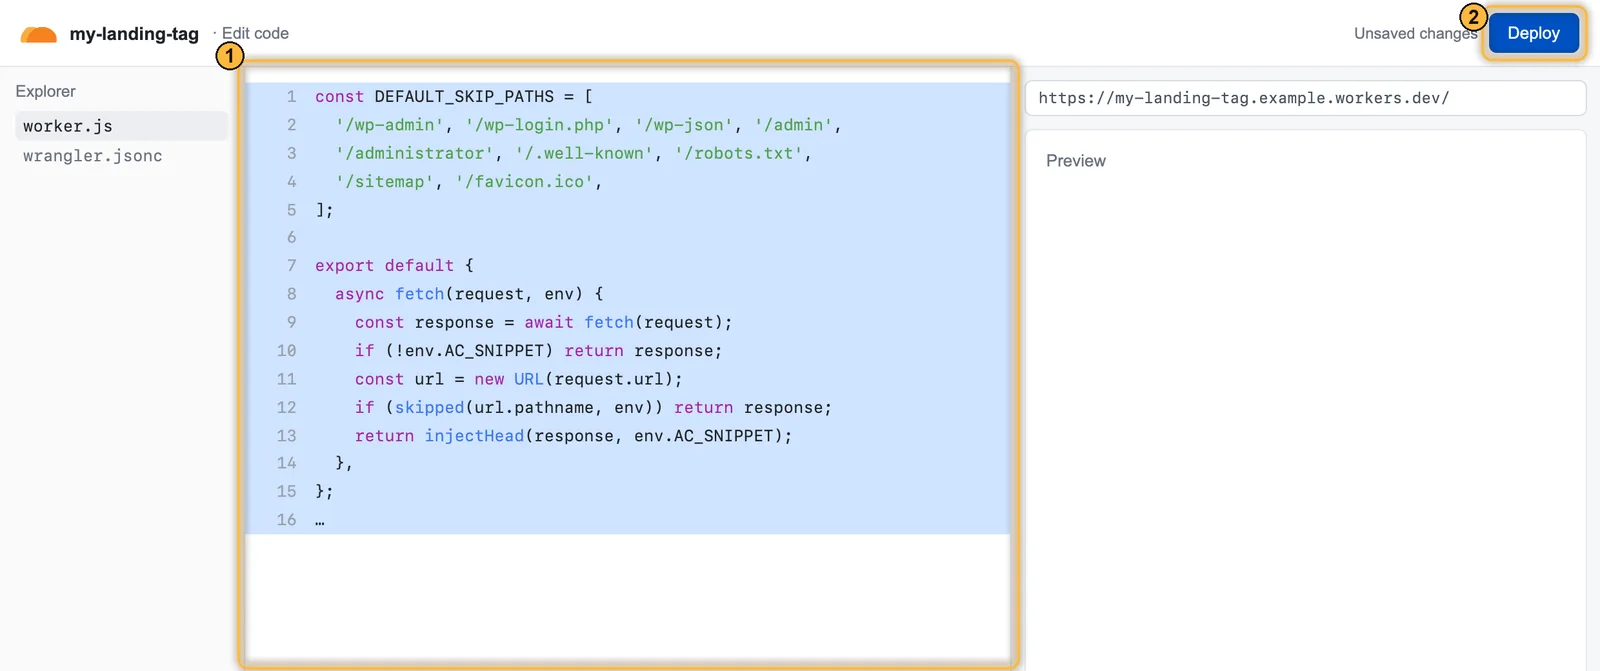
1 the whole worker code: select all and paste the code from the dashboard, 2 Deploy. Mock-up of the Cloudflare screen with made-up data. Click Deploy in the editor
The Deploy button in the top right of the editor. Wait for the message that the code is published, and go back to the worker page.
A common mistake is pasting the code over part of the old one or leaving stray “Hello World” lines. If the editor underlines an error or Deploy fails, select everything again and paste the code anew.
Step 3. Add the AC_SNIPPET variable
Open the worker settings
The Settings tab → the Variables and Secrets block → Add.
Fill in the form
VariableType: Text ← not Secret Name: AC_SNIPPET ← exactly like this, in capitals Value: the whole “Code to paste” from the dashboard, unchangedThe value is field 1 in the dashboard's Cloudflare block: a line starting with
<script. Copy it with the copy button, not by selecting with the mouse, so you don't lose the beginning or the end.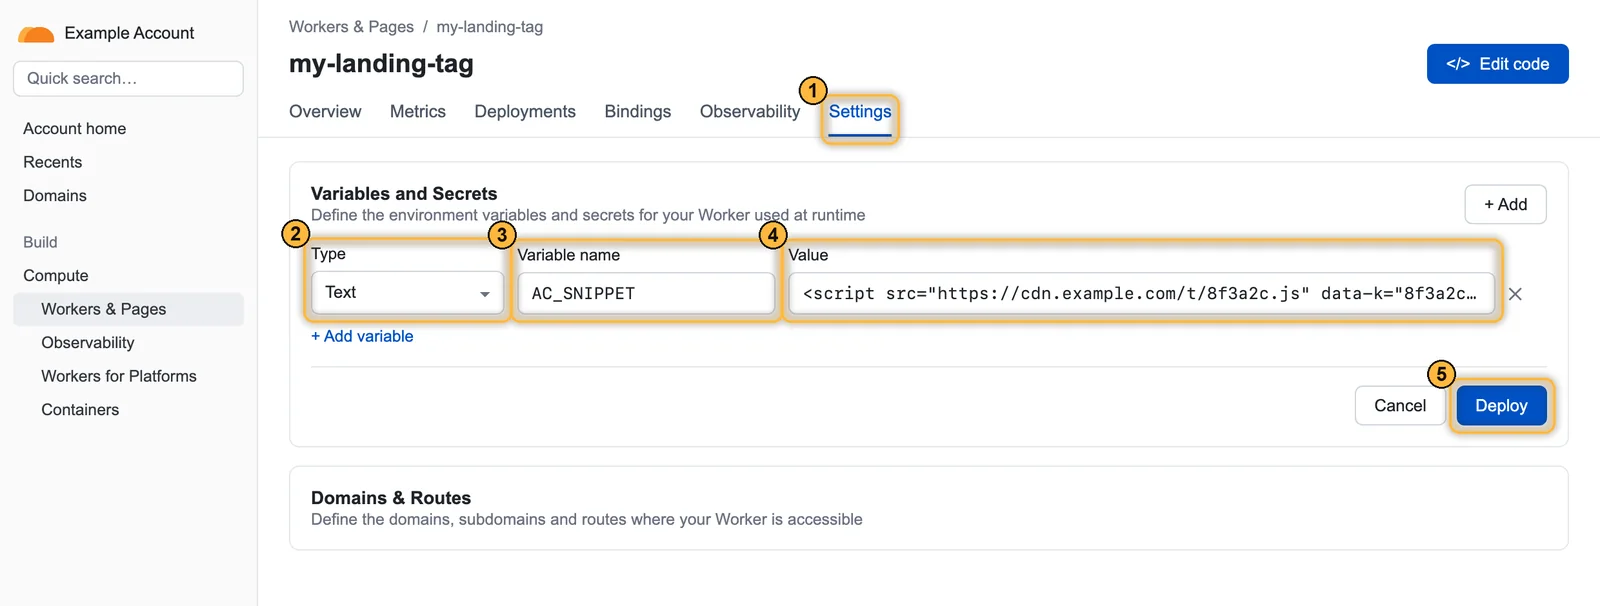
1 Settings, 2 Type: Text, 3 name AC_SNIPPET, 4 value: the embed code, 5 Deploy. Mock-up of the Cloudflare screen with made-up data. Click Deploy
After you add the variable, Cloudflare shows a Deploy button. Click it, or the variable won't apply.
If you don't click Deploy after adding the variable, the worker will run but have nothing to insert: the tag won't appear on the pages, and there won't be any errors.
Step 4. Bind the worker to the landing address
A route tells Cloudflare at which addresses to run the worker. You can add it from the worker settings or from the domain; the result is the same.
From the worker
Settings → Domains & Routes → Add → Route: pick the zone (domain) and enter the pattern, then Add route.
Or from the domain
Open the landing's domain → in the left menu Workers Routes 1 → Add route 2.
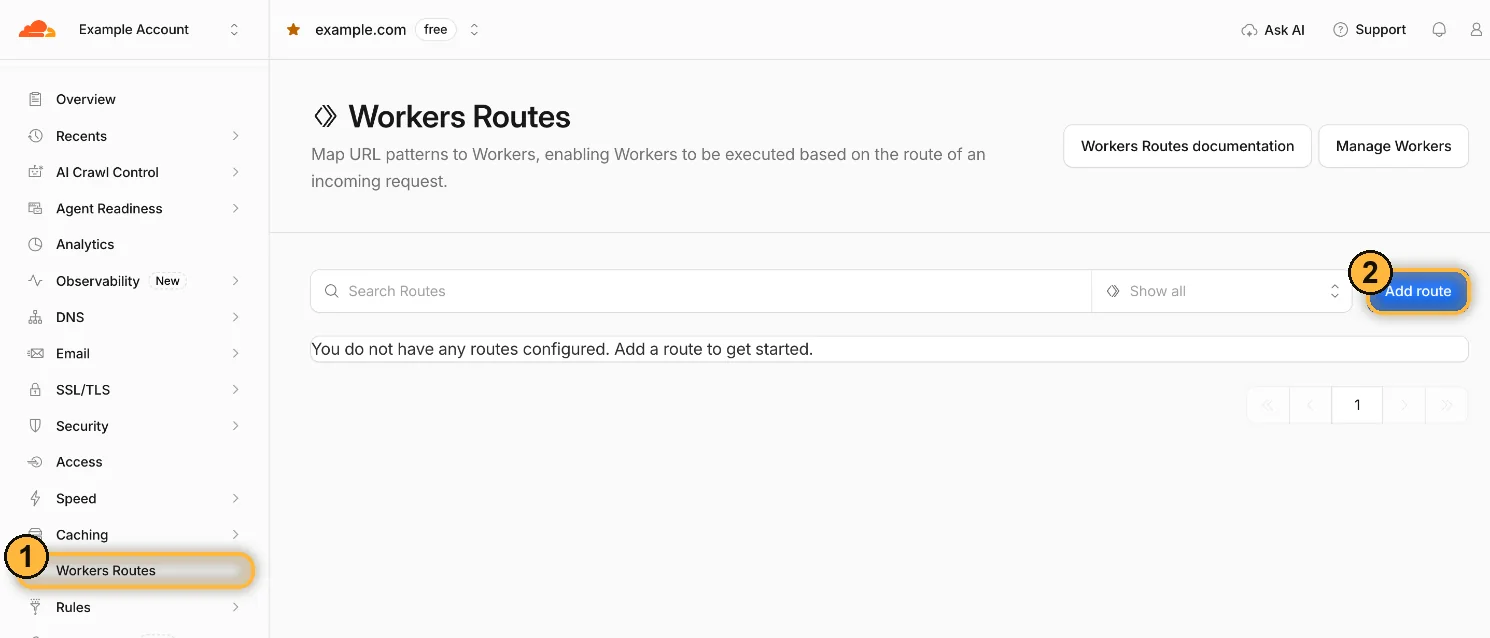
1 Workers Routes, 2 Add route. Fill in the route
Route 3 is the landing address pattern, Worker 4 is your worker from the list, then Save 5.
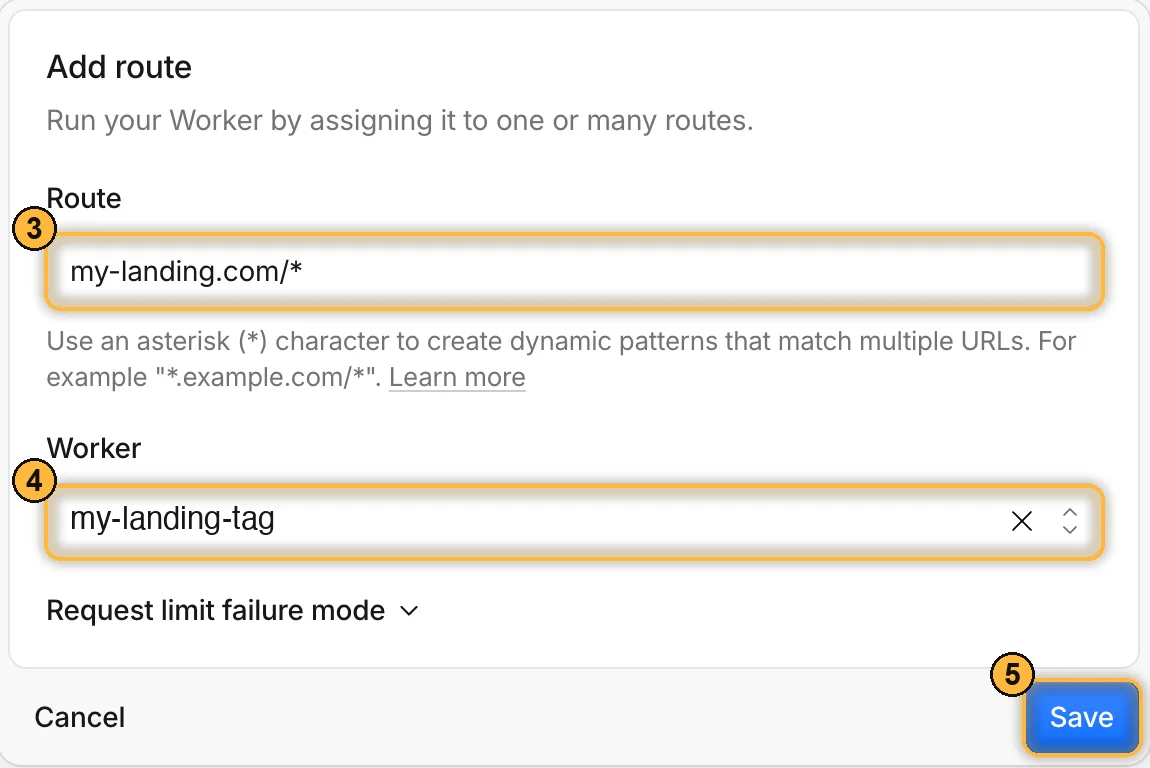
3 pattern, 4 worker, 5 Save. Pattern examplesmy-landing.com/* ← the whole domain without www www.my-landing.com/* ← the www version is a separate route lp.my-landing.com/* ← a subdomain my-landing.com/promo/* ← one folder onlyThe route must match the address the ads lead to.
my-landing.com/*doesn't coverwww.my-landing.com; that one needs its own route.
Step 5. Check in the dashboard
Open the landing yourself
A private browser window, the address from the ad.
Click “Check my page”
In the flow's connection window, in the Add the script to your landing page block: the Cloudflare block has no check button and no “Installed” mark of its own. The worker installs the same JS tag, so the JS tag block gets “Installed”: right away if the check found the tag, or after the first visit. The visit appears in the Click log.
What the worker does and doesn't do
- Does: inserts the tag as the first element in the
<head>of HTML pages the server returned with a 200 code for a regular (GET) request. Order matters: the tag must run before the first render. - Doesn't decide on its own. The tag still makes the decision, so all flow settings work, including the JavaScript check and the minimum time on page.
- Doesn't touch service addresses (
/wp-admin,/wp-login.php,/wp-json,/admin,/administrator,/.well-known,/robots.txt,/sitemap,/favicon.ico), nor any non-HTML response or any response with a code other than 200.
Your own list of skipped paths is set with the AC_SKIP_PATHS variable: comma-separated paths. It replaces the built-in list rather than adding to it, so list again any built-in paths you need.
/wp-admin,/wp-login.php,/wp-json,/admin,/sitemap,/robots.txt,/my-panelA path excludes itself, everything inside it and files with the same name: /sitemap means both /sitemap.xml and /sitemap_index.xml. It doesn't affect neighboring addresses: /admin doesn't exclude /administracao or /admin-guide. Letter case doesn't matter: /Admin is excluded just like /admin.
When to update AC_SNIPPET
A flow's code to paste doesn't change: the flow's settings don't affect it, and you don't need to update AC_SNIPPET. You only need to change it if you switch the worker to another flow: each flow has its own code, so copy it into AC_SNIPPET and click Deploy. The host name the tag loads from is tied to your account and doesn't change by itself.
The free Workers plan allows 100,000 requests a day. The worker runs on every request to the site, images and styles included, even though it only changes HTML. If you get more than 100,000 requests a day, you need Workers Paid ($5 a month).
Checking and troubleshooting
Open the page source or run the command below: our tag should be at the start of <head>:
curl -s https://my-landing.com/ | head -5| What you see | Why | What to do |
|---|---|---|
No tag in <head> anywhere | Gray cloud: Cloudflare isn't proxying the domain, so the worker doesn't run. | Turn on proxying for the record (orange cloud) in Cloudflare DNS. |
| No tag, though the cloud is orange | Deploy wasn't clicked after adding AC_SNIPPET. | Open the worker's variables and click Deploy. |
| The tag is on one address but not another | The route doesn't match the address the site is opened at: www, a subdomain. | Add a route for each host: www.my-landing.com/*, lp.my-landing.com/*. |
| Changes don't show | The Cloudflare or browser cache serves an old copy of the page. | Purge the cache in Cloudflare (Caching → Purge) and check in a private window. |
| No tag on one page | The page is served with a code other than 200 (redirect, 404) or not as HTML. | Send ads to an address that responds with 200 and HTML. |
| No tag on pages in one folder | The path is in the skipped list: the built-in one or AC_SKIP_PATHS. | Check the list: a path excludes everything inside it and files with the same name. |
ArtisanClo · Dashboard documentation. Questions — info@artisanclo.com or @artisanclo_support on Telegram.